The PrimaFoodie Guide to Heirloom Foods

People line up for these tomatoes at the farmers’ market. Devotees follow a purveyor of these beans on Instagram. Heads turn for these radishes in the produce aisle. What’s the commonality of these foods? They’re heirlooms.

Heirloom foods have been around for centuries, but they seemed to have captured more widespread attention in more recent years. One reason is that heirloom varieties are the antidote to all that’s commercial, genetically modified, and mass-produced (more on that below). Another is that there’s an enigmatic quality to heirloom foods—which has us compelled to demystify what they are. 

Heirloom Foods 101

In the simplest terms, an heirloom variety is a type of food—be it a vegetable, fruit, legume, flower, or grain—from seeds that have been repeatedly openly pollinated for a period of time and never crossbred nor modified. “Open pollination” means the natural occurrence of pollination that happens by wind, insect, bird, or another totally organic means. As for the “period of time,” experts vary over this with some stating that heirloom seeds need be at least five decades old and others claiming the seeds should be from years prior to World War II.

The descriptor “heirloom” pulls from the fact that these seeds have been honored and shared throughout time, often being passed from generation to generation within communities or families. This explains the often nostalgic, protected, proud aura that surrounds these varieties.

The Definition Debate

While the above all stands true, a uniform, legal definition for what makes a food heirloom does not exist—which makes these foods subject to debate. Unlike the specific guidelines that mandate what constitutes “organic,” heirloom foods are subject to the producer from which they’re offered. The word is used casually and often interchangeably with “heritage,” which more so describes poultry and meats that come from an original breed of animal with a long history. 

Benefits and Appeal 

To eat an heirloom tomato is to know, at first bite, the reasons for its appeal. The vibrant, juicy, robust flavor is electric compared to widespread varieties—conventional and organic. The same for a batch of heirloom cranberry beans: Creamy and velvety, they’re in a different league than their canned peers. Flavor is the power and appeal of heirloom varieties. They’re unparalleled.

While research is limited, some farmers and food experts believe heritage foods have greater nutrient densities due to their purity. This belief is bolstered by studies that the nutritional values of many crops today—conventional and organic—are significantly declining due to the effects of mass production and toxic chemical use.

Heirloom varieties also present a beacon of truth in a food system that puts profits over purpose and health. They tend to come from independent farms, (it’s rarer to find mass-scale farms growing heirlooms), which means purchasing them is an act of supporting small and local food businesses. 

And we have to say, there’s a romance to heirloom foods. Maintaining the integrity of an heirloom variety requires a specific set of attention that often leads to yields that are much smaller than those of other varieties. This evokes a greater appreciation and invitation to slow down: When you’re eating an heirloom tomato, for example, you’re eating a story and it needs to be savored.

Sourcing Tips

Not all heirloom varieties are certified organic. This is why when sourcing heirloom varieties, it’s important to get to know your farmer or purveyor to ask them questions about the conditions in which they grow their foods. You’re likely to find the widest variety of local heirloom varieties of fruits, vegetables, flowers, and legumes at your local farmers’ market. Scope them out and ask about the heritage of the seed, the growing conditions, and what makes that particular heirloom variety special. You’ll likely end up learning a ton about nutrients, flavors, and farming history.  

A few excellent resources on heirloom foods include:

Edible Memory by Jennifer A. Jordan

Sustainable America

Rare Seeds

Rancho Gordo

Seed Savers

Heirloom Seeds by Amna Fadel


The PrimaFoodie Guide to Honey

Honey is one of the ingredients I value most in my pantry. Its layered natural flavor, which can vary from floral to earthy to nutty, adds a sweetness to dishes. It’s an essential ingredient in my Sumactail and Basilberry Mocktail recipe. I also love adding it to dessert dishes like Baked Apple Jack to enhance the fruit. 

This sweet golden liquid is as good drizzled on roasted carrots as it is swirled into a glass of hot tea. But there’s so much more to it—and a lot that’s misunderstood. Here, we break it down.

xPrimaFoodie

Honey 101

A thick, rich, golden liquid, honey comes from the orchestrated teamwork of honeybees living in a colony. They work in harmony to extract nectar from flowers and other vegetal sources (hence the varying flavors), then engage in a detailed process of digesting and regurgitating the nectar so it mixes with their natural enzymes. Eventually this process causes the nectar to thicken into the golden, sweet goo that is honey.

Nutritional and Medicinal Properties

For centuries, cultures across the globe have been using honey for its nutritional elements and healing benefits. Research shows that honey, deemed a “flavorful liquid food of high nutritional value,” boasts numerous flavonoid antioxidants, as well as small amounts of various minerals including calcium, copper, iron, magnesium, manganese, phosphorus, potassium, and zinc. It also has a lower glycemic index than sugar.

In addition to being a nutrient-dense alternative to sugar and other conventional sweeteners, honey has many medicinal benefits— which is why ancient cultures have long used it as a cure for ailments. It naturally has anti-bacterial and anti-fungal properties, making it a protective salve. And studies have shown it to boast anti-inflammatory capabilities, to stimulate immune responses within a wound, and to provide allergy relief.  

Types of Honey 

Honey is as complex as it is delicious. This is because the busy bees that make it live in different regions across the globe and extract nectar from various sources of local vegetation. For example, when a honey is called ‘Orange Blossom Honey, this means that the bees mainly frequented orange blossoms for their nectar. The same goes for ‘Buckwheat Honey,’ ‘Lavender Honey,' ’Wildflower Honey,’ and countless other varieties. The flavor profiles and nutritional values will vary depending on where the bees have sourced their nectar.  

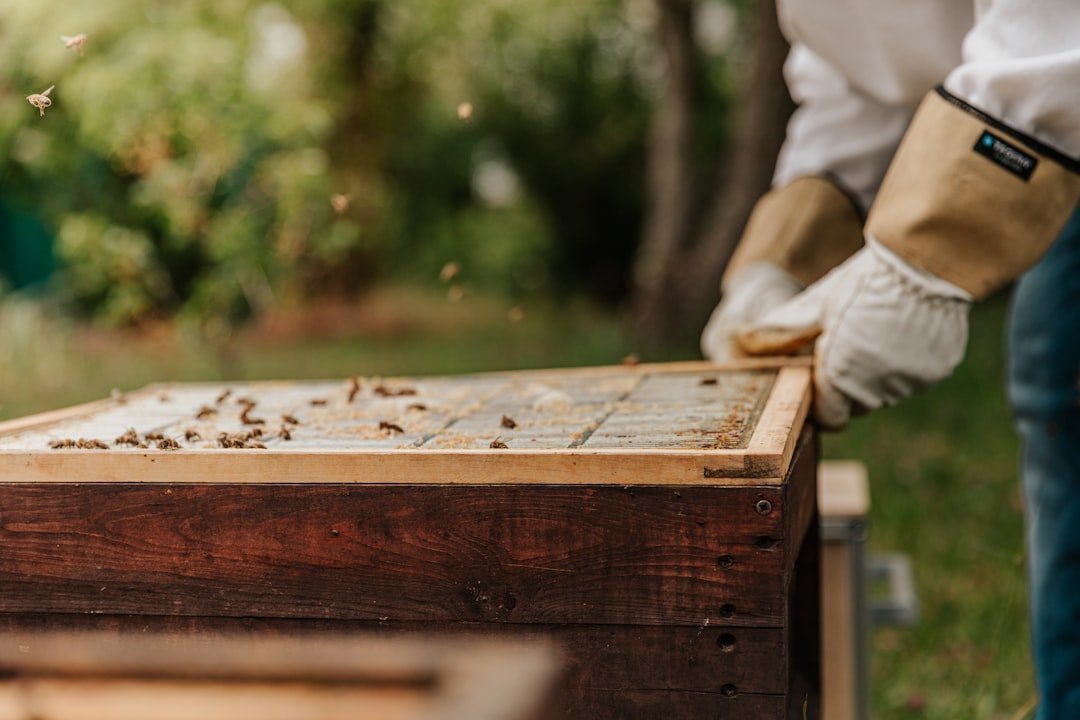
The Plight of the Bees

While it may seem easy enough to grab a jar of honey off the shelves, the complex world of honey's natural makers is in danger. ‘The plight of the honeybee,’ as stated by the advocacy group Friends of the Earth, is a serious issue. The globe’s honeybee population is rapidly declining due to use of fertilizers and pesticides, disease, habitat loss, and other unsustainable human-made practices. This presents dire consequences for essentially every ecosystem on earth, as bees’ pollination impacts the flourishing of countless vegetal species. Losing bees would create a great danger to our existing global food systems.

Growing Demand

Trend analysis shows a growing demand for honey—which, of course, fuels a need for its supply. As a result, honey has become greatly commercialized and industrialized to accommodate this growing need. Many commercial sourcing methods include forced, exploitative, and extractive measures and thus treat the bees with little to no consideration or care. In some industrial or commercial hives, human workers employ smoke techniques to extract bees. Others cut the queen bee’s wings to prevent her from leaving the colony to go to a new hive (thus impeding her ability to mate).  Some honeybees are fed artificial sweeteners, such as sugar water or high fructose corn syrup. This lacks nutrition leaving their immunity compromised.

Sustainable Sourcing

While all pure and natural honey is nature’s gold, not all honey on the shelves is equal. Unsustainable practices, cruel measures, and other cryptic means can often lead to adulterated, pesticide-laden, or even artificial honey. To ensure you get the highest product with the most concentrated nutrients, it’s important to look out for several things:

  • Local: The best honey to get is local honey. This ensures it’s fresh and derives from nectar from the region you live in (which can be great for combating allergies). You can source good quality, real raw honey from your local farmers market. As always, be sure to ask questions about harvesting and bee treatment—and get to know your farmers.  

  • Raw and Unfiltered: Raw honey is the densest in nutrients and healthy enzymes. That is because it has undergone limited to no processing from the hive to the jar, so it’s in its purest form. There may be some trace impurities in raw honey. Unfiltered honey may undergo a mild straining to remove some impurities, but it is done so in a way that honors the honey’s integrity. 

    Honey that is not marked pure raw or unfiltered means that it has likely been processed, blended with carrier ingredients (like corn syrup), or heated in a way that will jeopardize its natural purity. High amounts of heating and/or filtering often robs the liquid of its beneficial natural enzymes, chemical compounds, and antioxidant properties.

  • Humane Sourcing: As previously mentioned, honoring the integrity of the bees is critical. Aim to source from local farmers who humanely care for their bees or brands who put transparency and ethics first. 

What to Look for in the Market

Like shopping for eggs, sourcing a good quality honey in the market requires a bit of a dance. The first marker: Look on the jar to find the honey’s location of origin. Again, it’s always best to purchase honey that is harvested in the region you live in.

Some markets offer honey that is labeled organic, which would ideally mean that the bees are humanely treated and allowed to pull nectar from vegetation that hasn’t been treated with pesticides. This is ideal, but nearly impossible to fully guarantee. When ethical beekeepers bring their bees to source their nectar, it’s impossible to know if the bees are always pulling from vegetation that is, in fact, organic.  Therefore, when it comes to honey in the US, the organic marker is still nebulous. Most labeled organic are a blend of honeys from other countries, usually Mexico and Brazil. 

Rather than being lured in by the ‘organic label’ in this case, look for other markers that communicate that the honey has been ethically and locally produced in your region. True Source Certified, an independent third-party verification system, is an excellent marker as it verifies authenticity, purity, and traceability of ethically produced honey.

PrimaFoodie-Approved Brands

Here are some of our favorite honey brands at PrimaFoodie. Each follows ethical beekeeping and harvesting practices:

  • Honey Pacifica: With apiaries in southern California, Honey Pacifica has partnerships with local farmers to provide ample space, crops, and water for their honeybees.

  • Bloom Honey: Bloom Honey is unfiltered and unpasteurized. It’s also True Source Certified.

  • Blue Ridge Honey: Ethically produced, family owned, and local to California.

  • White Gold Honey: White Gold is based out of Canada. Although all of us at PrimaFoodie aim to source local honey in California, this company boasts excellent standards. They produce unheated, unfiltered, untreated, unprocessed pure raw honey.

6 Easy Swaps that Make the Holidays Much Healthier (and Just as Delicious)

The holidays come with an abundance of indulgent foods. Think about it: What festive gathering isn’t centered around some decadent treat, elaborate meal, or sweet bite? We often find ourselves binge-eating during this time, which only creates lackluster moods and sluggish brain fog. This season, we would like to encourage you to make choices that will keep you feeling lucid, energized, and happy. These simple swaps trade empty calories for dense nutrition without compromising any holiday flavor.  


1. The Classic: Eggnog

The Swap: Brazil Nut Milk with Fresh Nutmeg

IMG_9879 (1).jpg

Most eggnogs are made of raw egg, loads of sugar, heavy cream, bourbon, and nutmeg. (If we handed you a handful of sugar to eat you would probably politely decline, but that’s essentially what you’re doing when you drink a cup of eggnog.) Instead, lean into the spicy, creamy goodness of this holiday treat with BrazilNut Milk. Our PrimaFoodie recipe makes the frothiest, creamiest drink. We love to add vanilla extract, cinnamon, and a good dusting of fresh nutmeg to ours. You’ll never miss the Nog.


2. The Classic: Mashed Potatoes 

The Swap: Parsnip Purée

IMG_8736.jpg

 Mashed potatoes are usually a highlight on any holiday table. Unfortunately, they are filled with butter and heavy cream and very little nutrition. On top of that, potato is a high glycemic food that essentially turns into sugar when digested by the body. You can still get that creamy starch with parsnips. This low-glycemic root vegetable is just as satisfying with roasted meats, gravy, and all the fixings. (Plus it’s approved for SIBO and Low FODMAP diets.)


3. The Classic: Pasta

The Swap: Spaghetti Squash, Celeriac Noodles, or Zucchini Noodles

IMG_4651.jpg

The highlight of a good pasta dish is usually the al dente texture of the pasta and the flavor of the sauce. When cooked just right, a thin “zoodle” made from squash, celeriac, or zucchini noodle still gives you that pasta bite while being a healthy vehicle for your Italian gravy.  


4. The Classic: Starbucks Chai Latte

The Swap: PrimaFoodie Chai Latte   

IMG_3577.jpg

For some, Starbucks is everything. But we simply cannot stand by them when they douse their lattes with milk and simple syrups filled with sugars, corn syrups, and added preservatives. The PrimaFoodie Chai uses smooth brazil nut milk, and delightful—and healthy—spices.


5. The Classic: Milk Chocolate

The Swap: Dark Chocolate  

For those on SIBO and Low FODMAP diets, milk chocolate is a big no. Swapping that for 100 percent cacao raw chocolate can satisfy your chocolate craving without the added milk and sugar. Plus, raw cacao is rich in antioxidants and minerals. We melt ours down with a bit of local honey and some coconut oil to make our chocolate almond butter cups, dip fruit, homemade marshmallows, and biscotti.

6. The Classic: Bread

The Swap: Macadamia Nut Bread

IMG_2703.jpg

Trust Nichole when she says: You can survive the holidays without gluten. Here’s one way: Make the PrimaFoodie Macadamia Nut Bread. Toast and spread a thick layer of homemade jam on top. It also makes for a quick dessert with a little raw cocoa dusting.


Kids and Cooking: Safety Essentials

I love cooking with my daughter. It is a wonderful way to bond, and the experience allows me to teach her important life skills and instill in her a passion for healthy food. 

The kitchen is a place to learn, grow, and build self-esteem. It is also a place filled with possible hazards, considering the sharp knives, hot pans, and other potential harmful tools. That is why  it’s important to alter your cooking habits to keep your children safe from accidents. The following simple guidelines can help to ensure  that  cooking with your children is safe, fun, and rewarding. 

Everything In Its Place

Creating dedicated and separate workstations for you and your children is important. This allows your child the space to work away from sharp objects. Keep the areas clean and organized so you don’t risk knocking something over. Children also feel empowered when they have their own space. I love this toddler tower, or you can use a chair with the chair back against the counter. 

Heat Safety

Heat is one of the most dangerous things for children in the kitchen, and it’s one of the easiest things to safeguard against. Get in the habit of turning pot and pan handles in and away from other burners on your stove so your child can’t accidentally knock them over. Always test handles before grabbing them with an oven mitt or a folded thick towel. When using the oven, never stick your arms inside to remove pans. Always pull the rack out first, then retrieve your dish (unless you have elbow-length oven mitts). Children need to be strong enough to pull out the rack before they can use the oven by themselves; my six-year-old still struggles with this, so she knows to ask for help. If you have a gas oven, open it very slowly after turning on the broil function, as heat can pool and cause flames to erupt when exposed to more air. 

Sharp Matters 

There are several precautions you can take to keep your children safe from  knives. 

Most importantly, keep knives out of reach at all times, even if you are just turning around to grab something. Always set the knife down flat on a cutting board placed at least six inches from the edge of the counter. Even an adult can accidentally knock off a knife if they brush too closely to a counter. Always set a knife down when you’re not using it. Never turn around or gesture while holding a knife. This sets a good example, as kids tend to talk while waving around their utensils. Use two hands to cut, one hand holding the knife and the other holding the food. The hand holding the food should be in a claw position, so fingers don’t end up under the blade. Hands should never rest on the cutting board. 

When washing knives, dry them immediately and put them away. The proper way to hand someone a knife is by the handle with the blade pointing towards you, so they can grab the handle. Keep your knives in top shape by regularly honing them to even out nicks and sharpening them as needed. All knives can be dangerous, but a dull knife even more so because it requires more pressure to cut, which gives you less control over the knife, increasing the chance for it to slip. I am not a melodramatic person, but I do not take unnecessary risks in the kitchen. Making these habits a part of your everyday behavior keeps everyone safe. 

Knife Rules for Children

Allowing children to use knives in the kitchen is a personal decision based on your own comfort level. I believe that if you can provide proper and close supervision, you can teach your children to use knives safely, so don’t immediately dismiss them as irresponsible or not ready. When given the opportunity, kids can learn to do a lot, especially if you are patient.

I began gradually introducing my daughter to knives and knife safety when she was a toddler. She began cutting with a wavy chopper more independently when she was four and graduated to using a kids’ steak knife around five. More recently, at six, she started practicing with a paring knife. Older children can use knives more safely with less supervision, but you need to give them the tools to succeed. I recommend Montessori knives. Start young children with nylon knives, and from there, you can move to a stainless-steel wavy chopper. I actually skipped nylon knives and started with the wavy chopper. There is another wavy chopper with a handle, but I find it to be a little difficult for small children to use because they lack the motor skills and manual dexterity to grasp it. By the time they can properly use it, they are likely ready to use a paring knife with close supervision. 

Every parent knows their child best, but here are some general guidelines for what kids of all ages can do: Very young children around three can use dull knives to slice soft foods like strawberries and spread nut butter onto toast. Around five they can slice harder foods with crinkle-cut knives, and around six they can use a small paring knife to help prepare ingredients. By eight, most children are ready to use a chef’s knife under close supervision, putting them in the running to become your little sous chef.

No matter how old your children are when you start cooking with them, or how far along they are in their kitchen savviness, all children need the same things: to have emotional and physical readiness, be able to follow instructions, and have an interest in learning. When kids really want to do something, they are more likely to focus and to follow safety directions. Have fun with them in the kitchen. Let them choose a delicious recipe they want to eat, pick a time when you aren’t rushed to cook together, and expect imperfection. It’s okay that the cookies are misshapen and different sizes. Your kids will be so proud of their own creations.

With Love,
PrimaFoodie

The Case for Keeping a Clean Fridge

When doing an overhaul of your life, and deciding to eat differently, your refrigerator is a good place to start. A clean and organized fridge eliminates the frustrating clutter of expired food, and reduces the number of decisions you have to make when mealtime comes around. Everything—from produce to meats to homemade sauces—will be fresh, clean, and in their place.  This will be the difference between slamming the door and saying “forget it, let’s order takeout,” and feeling inspired to cook a healthy meal.

There are so many other reasons to keep a tidy refrigerator and freezer, all of which go way beyond my love for an organized space. A streamlined fridge impacts your health, your bank account, and the Earth. It also supports family members with allergies, food sensitivities, or healing diet protocols.  As I unveil below,  a clean fridge is an anchor to a clean and conscious lifestyle.


Reduces Food Waste and Increases Money Savings

Wasted food is one of the biggest problems facing our food supply. According to the FDA, the United States is the global leader in food waste. Nearly 30- to 40-percent of the food supply is not eaten and eventually thrown away. Food is the single largest component taking up space in our landfills. 

Closer to home, not eating everything you purchase is not just bad for the environment, but it’s an expensive habit. High-quality ingredients cost more, and poor meal planning or storage results in throwing money away. In my house, we have a zero-food waste goal, which keeping an organized fridge helps me to achieve. An organized fridge allows you to see everything you have. This means you won’t accidentally buy the same thing twice. It helps with meal planning, making it easier to have a specific purpose for each item, including meals, snacks, and even leftover ideas. I store all homemade sauces, dressings, nut milks, and leftovers in glass containers and label them with expiration dates.

Protects Gut Health

An organized fridge also cuts down on overcrowding, which allows for air to properly circulate around your food, extending its shelf life and keeping it as fresh as possible for longer. Spoiled food can grow both bacteria and mold, which is an airborne fungus with spores. Mold can make you sick—one group of mold is a mycotoxin, which can cause cancer—and can also trigger or intensify other health issues. Bacteria and mold cause the rest of your produce to decay faster, leading to food and money waste. Spoiled food is a culprit in food poisoning. And the introduction of harmful bacteria to your gut creates an imbalance that burdens your digestive system, which is already working  hard to keep you healthy. 

The Clean Fridge: A Step-by-Step Guide

#1. The Clean-Out

The first step to a clean fridge is deep cleaning it, which means removing everything and thoroughly cleaning it inside and out. You don’t need strong chemicals or bleach to do this. Use a 1:1 mix of water and white vinegar, adding ¼ cup of baking soda for every quart of hot water if you need to scrub it. You can also use a natural cleaning product—but remember, food absorbs odors, so it’s best to use unscented products. Many fridges allow you to turn off the open-door indicator, so check your instruction manual before you start and you won’t be annoyed with the beeping. 

Begin by gathering your supplies. You’ll need a cooler bag or ice chest, plastic bags, rubber gloves, cleaning solution, sponges, and microfiber cloths. Take out everything from your fridge and store highly perishable items in a cooler while you clean. Check the expiration dates on all store-bought products, throw out anything expired. Make a note of things expiring soon so you can use them. Remove all shelves and drawers, wash them in the sink with your cleaning solution, rinse thoroughly in hot water, and wipe dry. Don’t forget the refrigerator door seal, which is frequently missed. Repeat this deep cleaning every six months. 

Once you give your fridge a deep clean, it’s easier to keep it clean. Once a week, wipe down the interior, including bins, and the exterior of your fridge. This can be part of your regular housekeeping routine. You can use a 10:1 water and alcohol mixture, or a 1:1 water and white vinegar solution to clean it. If you work through most of your produce weekly, it’s easy to pull out the few things that last longer and quickly wipe each drawer and shelf. 

#2 Categorize 

Take a look at how you like to eat and cook, then designate certain areas or shelves to the most important categories. Leftovers can take one to two shelves. Your family will quickly learn to look here first when they open the fridge. Store produce in the bins. For the most part, vegetables generally last longer in a high-humidity environment where there is little airflow, and fruits do better in low humidity environments with more airflow, so store them in separate bins with the appropriate humidity setting. Keep ethylene-producing fruits (those that continue to ripen after being picked) such as bananas, apples and avocados separate from other food, as ethylene can cause other foods to spoil more quickly. Keep snacks for your children in an easy-to-reach spot. I’m not a huge fan of snacking as an overall rule for anyone, but sometimes we do need a snack. Having a designated refrigerator space for kids is a great way to cut down on negotiations and encourage independence. Treat your fridge like your personal grocery store. When you make or buy a new nut milk or bone broth, put it in the back and move the older ones in the front, which ensures the oldest will be consumed first. Most importantly, keep things visible. When you see food, you’ll eat it. When food is hidden, it can sit in your fridge until it goes bad. 

#3 Acknowledge Food Restrictions and Special Diets

Dealing with food limitations can be difficult for people on restrictive diets. That mental burden can be even heavier when food restrictions cause conflict in families who don’t all want to adhere to the restrictive diet. You can make it as easy as possible for everyone with a few simple processes. First, have a conversation about “tricky foods” with all family members, housekeepers, and nannies. They are more likely to follow the procedures if they understand why they are essential. Next, dedicate a corner of a shelf or a row on a door for a family member with a special diet so they can easily find their food. Finally, label food with something quick and easy to write. We mark our food with removable tape and write an “N” with a circle around it and a line through it, so everyone knows it is not okay for Nichole to eat. When you have houseguests, walk them through your food storage protocol or print out a laminated cheat sheet in a visible location in the kitchen. 

At first, cleaning and maintaining an organization fridge may seem like a mundane task, one that you don’t have time for. But once you make it a habit, opening your refrigerator will no longer bring you frustration—it will be a satisfying moment that offers a well of cooking possibility. 

With Love,
PrimaFoodie

How to Meal Plan: Meal Planning Basics

Meal planning will save you time and help minimize food waste, but even more than that, it’s the first small step you can take to alter your food journey and change your life for the better. If you’ve been wanting to change your eating habits, to eat real, whole food, to have the greatest health possible and give your body the best chance possible to heal or just feel good, this is where to start!

I’m going to break down the powerful impact that small, consistent daily disciplines can have on your overall physical health and mental wellbeing. But before I launch into the details, I want to take a moment to encourage you - you have what it takes to do this no matter where you are now.

The small disciplines and actionable steps below may seem insignificant on their own, but when you apply them consistently over time and celebrate the “small wins” of making each choice, they’ll compound over time to transform your body and your mind. You can achieve real, wholistic health that makes you feel good, energetic, and free of foggy brain and daily exhaustion. And the empowerment that comes from making these choices transforms every aspect of our lives, contributing to harmony and balance in life.

You can do this, and as you start to make these small changes, you too will feel the missing pieces of your health start to fall into place in the most natural of ways.

DINNER

When I start planning, I like to start with dinners and fill in the rest of the week’s meals around those.

Choose 3-4 dinners for the week. Start with your protein, or entrée, and build sides around it. Sometimes, I build my sides based on the specific plants I want to work into our diet that week.

I recommend starting with just 1 new entrée a week and keep building on that. Trying to cook something different every night while you’re overhauling your diet and learning to cook with new ingredients can quickly cause burnout.

Refine 2-3 sauces/dressings. Start with one recipe a week and then try different versions of the same thing (pesto, green goddess dressing, cilantro lime, barbeque sauce, etc) until you land on the perfect version. I store mine in mason jars and label them with the name and “made on” date. Since the labels change constantly, I prefer these easily removable adhesive rolls. Many dressings will last 7-10 days in the refrigerator.

*Tip - If you make a sauce for a particular recipe, double the sauce and save the extra for the rest of the week. That sauce can transform bland vegetables into a delicious side dish or dipping sauce for your kids’ lunch.

Take into account leftovers. Think ahead about the viability of working the leftovers for a particular meal into your breakfast or lunch for the next day. For example, an egg over easy on top of leftover roasted pumpkin or butternut squash with vegetables is delicious, nutritious, and gives you steady, slow-burning energy until lunchtime.

BREAKFAST

When you’re thinking about how to meal plan for your family, it’s all about finding ways to save time and minimize waste, and finding creative ways to use leftovers throughout the week is one of my favorite ways to do just that! So once I’ve decided what’s for dinner, I plan breakfast for the week based on the leftovers I know I’m going to have.

Making breakfast from leftovers makes our mornings run more smoothly – and it can do the same for you!

No prep work. You don’t have to think about what to make every morning or worry about whether it’s a balanced, healthy meal because you’ve already put the time into planning for it ahead of time.

*Tip - enlist the help of your kids! My daughter loves to be a part of our meal planning. It’s amazing how much more cooperative kids are when they get to be involved! Here’s an example of a list she’s made:

Monday – oatmeal (soaked overnight)

Tuesday – hash (with leftover veggies and bacon, sausage, or a leftover dinner protein)

Wednesday – cereal (there are one or two brands I buy with only 4-8 grams of unrefined sugar that are organic and made with only 5 ingredients – to be eaten in moderation)

Thursday – omelette

Friday – porridge

My daughter knows I have the final stamp of approval, but when she’s been part of the decision-making process, then it’s her list. She can look at it throughout the week and not be surprised or disappointed, which has cut down our morning arguments about what’s for breakfast to almost none.

Mix it up and plan for variety. If she had her way, my daughter would have toast for breakfast every morning! By creating a plan and allowing her to help, I can make sure we aren’t eating the same thing every day. When we eat the same thing every day, our bodies start to develop food sensitivities, and we minimize and narrow down the amount of nutrients we take in.

LUNCH

The last step in my meal planning process is lunch. I used to plan the whole week in detail but, because I’ve been doing this for a while and can throw my daughter’s lunch together with “nothing” now, I don’t plan it out at all.

However, if you’re just getting started, planning out every meal for the week is the best way to go. It’ll be helpful in letting you know what to fill in from the grocery store.

When I shop, I usually hit the farmer’s market and place a small Instacart order on Sunday, and then one more small Instacart order later in the week.

As for my lunches, I often make salad out of the remaining dinner leftovers, so no additional planning is required.

Keep it Simple

This sounds like a lot when you’re first learning how to meal plan, and it may seem overwhelming or time-consuming. It is more work up front, but that time is concentrated – as you go through the rest of your week, you’ll find that you’re saving a lot more time overall.

And, as with anything, the more you meal plan, the better and more efficient you’ll get at it! I used to spend a lot more time planning out detailed weekly menus. Now, I spend about 10 minutes between breakfast and leaving for the farmer’s market on Sunday morning writing our weekly meal plan on a large yellow sticky note.

It doesn’t have to be pretty, and it’s okay to make mistakes! Learning how to meal plan doesn’t have to be complicated or perfect. Stick to the principle of simplicity, remember the power of making small, consistent changes, and you will be amazed at how something as simple as meal planning can start to change everything.


With Love,
PrimaFoodie